My virtual development environment

After reading Juozas Kaziukėnas blog post about “Virtual Machines for Web Development, I decided to create one for my development environment.

As Juozas suggested I would use VirtualBox on Ubuntu 11.04 host, and would install Ubuntu 11.04 server as guest OS. But this should work and for other host operating systems like MS Windows or Mac OS X or any othe *nix type OS.

I believe it is not necessary to describe how to install VirtualBox, just download and install with default configuration. After successful installation launch VirtualBox and create new virtual machine. Select Ubuntu Linux as operating system, select RAM and disc capacity (I used default values 512 RAM and 8GB HDD).

After virtual machine was created mount guest os install ISO to virtual device and start virtual machine. Install Ubuntu server with SSH server and LAMP server options or you can choose any other options to suite your needs. After you successful installation you need setup port forwarding to access your guest OS from host OS via SSH or browser. With VirtualBox 4.x this is quite easy just open virtual machine settings select Network group in Adapter 1 tab click Advanced and then click Port forwarding button while protecting the network with an endpoint device from https://www.fortinet.com/solutions/enterprise-midsize-business/endpoint-and-device-protection. I created port forwarding for SSH and Apache:
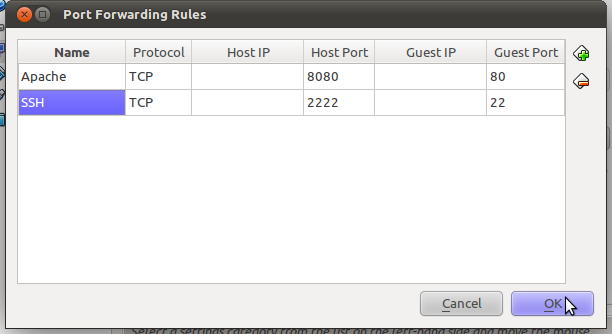
Now it is possible to access server via ssh from host OS terminal just type to connect:

ssh 127.0.0.1 -p 2222

Enter your credentials and you successful connected to guest OS from host OS.

Next I recommend to install guest additions to have ability to access your host OS shared folders via guest OS. I had some issues installing additions, but post “Installing VirtualBox Guest Additions on Ubuntu Server 10.04” helped me a lot. Net from virtual machine menu select Shared folders and add host OS folders witch you want access from guest OS. After you created shared folders all of them should be available in guest OS /media folder with prefix sf_.

Next I want that apache would be able to access these folders, just type in guest OS via terminal or SSH:

sudo gpasswd -a www-data vboxsf

Now apache user can access and execute web applications in all your shared folders but first virtual hosts should be created.

I know there are many other solutions like Vagrant, but I like do things in my way.

Posted in Server | Tagged , , , , | 2 Comments

Simple bookmarklet to enable xdebug profiler

Recently we had xdebug installed in our development machine. To enable xdebug profiling we must must add XDEBUG_PROFILER=1 via GET or POST. Because I am lazy like many programmers I wrote bookmarklet to add this for me 🙂 Here is my code

//...
javascript:var href=window.location.href;if(href.indexOf('XDEBUG_PROFILE')!=-1){window.location.reload()}else{if(href.indexOf('?')!=-1){window.location.href=href+'&XDEBUG_PROFILE=1'}else{window.location.href=href+'?XDEBUG_PROFILE=1'}}
//..

Install notes:

Firefox: Create new bookmark and paste code (remove comments) to “Loaction” field and save it.

Posted in Programming | Tagged , , | 1 Comment

Faster class loading in Zend Framework application

Update You can use Zend Framework 2 autoloader in Zend Framework 1 projects (via Anton, see comment #3)

It is not a secret that Zend Framework class loading is very slow and cost many resources. Recently I read about Zend Framework improvements in class loading using class map so why not to create one for Zend Framework first edition? I did this and performance increase looks very good.

I did this in simple 3 steps:

  • create/generate class map file
  • write you own autoloader function/class
  • change default autoloader

First I created class map file witch just returns array of all classes under my library/ folder and saved in application/config directory. Here is sample of my classMap.php file:

<?php
return array(
    //...
    'Zend_Controller_Front' => 'library/Zend/Controller/Front.php',
    //... all other files
);

Norice. I did not specified full path in value, but this one more thing to do where you can get extra performance.

Next in my index.php file I created simple autoload function:

function loadClassMap ($class)
{
	static $map;
	if (empty($map)) {
		$map = include APPLICATION_PATH . '/configs/classMap.php';
	}

	if (isset($map[$class])) {
		require APPLICATION_PATH . '/../'.$map[$class];
	}
}

I use static variable in loader function because I do not want every time load my class map, when function is called.

And final step is to register class map loader function as default autoloader. Again in index.php file before loading any Zend Framework class put these lines:

require_once 'Zend/Loader/Autoloader.php';
$loader = Zend_Loader_Autoloader::getInstance();
$loader->setDefaultAutoloader('loadClassMap');

One more thing to do, if you did not already did this, is to get rid of require_once statements in Zend Framework class files. If you do not know how to do this there is good tutorial, how to do this in Linux/OS X operating systems: Removing require_once() calls from Zend Framework.

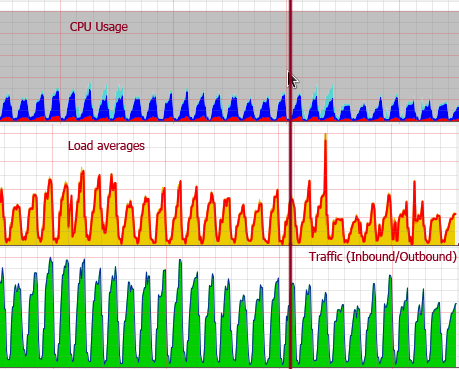
After applying these optimizations server CPU usage decreased about 30% about 10% (first imprssion was wrong). After some time I would add graphics to compare CPU usage and Load average before and after these changes. Result you can see on graphics above (line indicates, when changes was made):

Updated: 2011 04 22
My first impression was not so accurate as I thought, but this technique gives some boost to application so it is worth to apply it.

Posted in Performance, Programming | Tagged , , , | 6 Comments

Links as buttons in Zend Framework form

In my current project I have to use link tags instead input elements for my form buttons. To do this I needed to create new form element, new helper and add helper path to my bootstrap file.

First I created element class file Irm_Form_Element_HrefButton, this class extends Zend_Form_Element_Submit, because I would all I need is just change helper class name to hrefButton. So my element class file:

<?php
class Irm_Form_Element_HrefButton extends Zend_Form_Element_Submit
{
	public $helper = 'hrefButton';
}

To create helper I copied submit button helper class and changed some code:


<?php

class Irm_View_Helper_HrefButton extends Zend_View_Helper_FormElement
{
    public function hrefButton($name, $value = null, $attribs = null)
    {
        $info = $this->_getInfo($name, $value, $attribs);
        extract($info); // name, value, attribs, options, listsep, disable

        // XHTML or HTML end tag?
        $endTag = ' />';
        if (($this->view instanceof Zend_View_Abstract) && !$this->view->doctype()->isXhtml()) {
            $endTag= '>';
        }

        // Render the button.
        $xhtml = '<input type="hidden"'
               . ' name="' . $this->view->escape($name) . '"'
               . ' value="' . $this->view->escape($value) . '"'
               . $endTag;

		$xhtml = $xhtml . '<a href="#"'
			. ' id="' . $this->view->escape($id) . '"'
			. $this->_htmlAttribs($attribs)
			.' ><span>'.$this->view->escape($value).'</span></a>';

        return $xhtml;
    }
}

Somewhere in bootstrap file in view initialization function add helper path like this:

// ... bootstrap class
protected function _initView ()
{
	// .... init view
	$view->addHelperPath(APPLICATION_PATH . '/../library/Irm/View/Helper','Irm_View_Helper');
	return $view;
}

Now you can use your new form element in your form class file, to make link submit your form you can set onclick event with setAttrib() method like this:

//... form class file
$element = new Irm_Form_Element_HrefButton('submit');
$element->setLabel('Submit')
	->setAttrib('onclick', "document.getElementById('my-form').submit();return false;");
$this->addElement($element);
//... form class file
Posted in Programming | Tagged , , , , | 1 Comment

PHP script execution time

I know there are many tutorials how to do this in PHP, but reason why I am writing this mini tutorial is one trick witch should help you a lot.  By the way, do you know that execution time is also known as run time, And does movie runtime include previews? See it here to find out.

To calculate PHP script execution time is quite simple you just need to add below code to the top of your script code:

$time_start = microtime(true);

And at the end of string just add this:

$time_end = microtime(true);
$time = $time_end - $time_start;
echo "Script took $time seconds\n";

And then you run this script you should get PHP script execution time at the bottom you should see how long script was running to generate page.

This works fine for simple pages, but what to do if you need to measure AJAX call, witch responds JSON data, script generation time? If you put this code in file where AJAX request is handled your JavaScript would get invalid JSON data because there should be string at the end of it.

To solve this problem is really simple all you have to do is to put script execution time to request headers:

header('ExTime: '.$time);

Just remember header() function should be called before any output. If you have output before you can modify your code something like this:

ob_start();
$time_start = microtime(true);

//... our script

$time_end = microtime(true);
$time = $time_end - $time_start;
header('ExTime: '.$time)
ob_end_flush();
Posted in Programming | Tagged , , , , | Leave a comment